In some parts of the industry the jury are still out regarding the use of foam rolling before
training, after training or even ever at all. That’s understandable because it is a relatively new
trend which does require much more in-depth research in the future, but there are a few
things we do know that foam rolling can help us with…


Three good reasons there to spend a few minutes using the
foam roller before embarking on the Front Squat which is a
very athletically demanding lift. There is of course one more
very good reason to use the foam roller at the beginning of
this workout…if Andy McKenzie tells you to use the foam
roller, you use the foam roller!
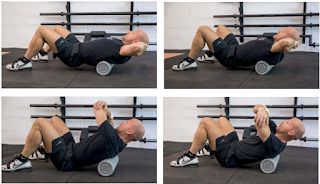
Begin by rolling the Thoracic Spine which is the longest
part of your spine, starting up at the base of the neck/top
of the shoulders and finishing down where your abdomen
meets your lower back.
Lie back with the foam roller perpendicular to your spine
running beneath both of your shoulders. Then cradle your
head with both hands and use your feet to roll your torso
up and down.
TOP TIP – It is very easy to roll across a tender spot and
to gasp audibly and/or to hold your breath, however this
can lift the rib cage and move it out of position. The key
thing is to relax and breathe to avoid this!!
Once you have rolled straight up and down 6-10 times then
lean towards each side to ensure that you are also rolling
the muscles either side of the spine too.
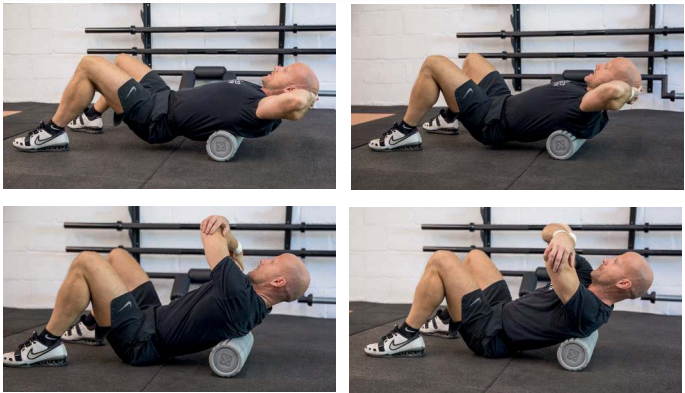
Next, find a pivot point just below the shoulder blades and
allow your hips to sink down to touch the floor, squeeze
your elbows together then allow your head to fall back
towards the floor also. Once your head is as far back as it
can go, open up the elbows and return to the start position.
You can repeat this 6-times but remember to stay relaxed
and breathe throughout.
Relax as much as you can, take the head and shoulders
back into extension then rotate and twist from side to side
a handful of times. If you take hold of both elbows with the
opposite hands and turn your torso from side to side when
you find a tender spot, then you should be able to target
any potential niggles anywhere in the Thoracic region.
Moving on to the Lats and Triceps, if they are tight then
it will limit how high you can lift your elbows which will
not only make it dificult to get into a comfortable Front
Squat position but if your elbows cannot lift high enough
then additional pressure will be placed on the wrists, so
these are very important preparation drills. Begin by simply
laying on your side starting with the foam roller under your
armpit. Roll up and down the length of the Triceps a few
times to identify any tender spots. When you find a spot
that is particularly tender drop the elbow to the floor and
pull your hand up towards the shoulder to extend the Tricep
and ensure that you get as deep as you can into the muscle
tissue.

One of the most common problems people have when executing a Front Squat is a lack of wrist mobility. This is partly
due to the increase of sedentary computer-based jobs and a reduction in labour intensive work. Spending some extra
time preparing the wrists for what is required is far more important than most people realise and well worth the efort.
Then, adopt a kneeling position (place a mat under your knees if you are not as tough as Andy) and place the back
of your right hand onto the floor 8-12 inches in front of your knees. Place your left hand on the crease of your right
wrist, so that the webbing between your left thumb and forefinger wraps neatly around the crease between your
right hand and wrist. The fingernails of your right hand should all be touching the floor at all times.
“Hold the right hand down in position
and then lower your right elbow down
towards the floor and then slowly
straighten your right elbow.” Repeat
this 6-10 times paying attention to the
range of motion each time. When your
right elbow is fully extended (straightened)
try to pull the right arm away
from the hand, creating a small bit
of space at the wrist joint, then you
can internally and externally rotate
your elbow as far as possible in both
directions. Shake the wrist of and the
repeat this the other way around.

Finally, place the right hand palm down flat on the floor, then place the left hand in the same position on top of the
hand. Lower the right elbow down towards the floor whilst simultaneously pulling it away from the hand, here you are
trying to stretch the skin and open up the wrist joint before lifting the elbow up so that it is directly above the wrist.
Move the elbow up and down in this manner 6-10 times trying to increase the amount of ‘space’ at the wrist each time.
This should be pain free and you should remain relaxed throughout. Swap sides and repeat on the other hand/wrist.

These drills can be repeated 2-3 times on each side before you are ready to move on to the next stage.
Get into a full depth squat position with both heels flat on the floor. Initially
we are focusing on the lower body being in the correct position, so if there is
some rounding or flexing of the spine that is ok. Just be aware that over time
we want to be able to keep the back in a straight position so your weight is
sitting back on your heels (rather than onto your toes) and your shoulders
will be directly above the middle of your foot.
Now place your elbows onto the inside of your knees and keep them in position
as if they had a bolt holding them in place. Once your elbows are in place gently
rock forward so that the palm of your hands are face-down on the floor.
Slowly move your bodyweight forwards, pressing your elbows as hard as
possible into the inside of your knees. This will start to create a little bit of
stability through the wrist and shoulder as they get used to withstanding more
of your bodyweight. Rock forwards and backwards 6-10 times gently loading
and unloading your bodyweight through the wrists.
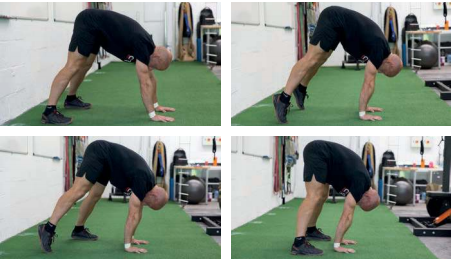
Once you have got used to that we can progress to the next stage. Make sure
your fingers are spread and are digging into the floor to help with balance, rock
forwards so that the majority of your bodyweight is being supported by the
wrists and shoulders. You should rock forward so far that your hips are practically
above your wrists and your feet will be right up on your tip toes.
When you feel confident, get to that same position (as above) and gently take
one foot away from the floor and hold. Place the first foot back on the floor and
then try this with the other foot. In between attempts you may want to rock back
into the squat position to relieve the wrists.
Finally, you should aim to be able to take both feet of the floor and to balance
with nothing other than your two hands on the floor. Having your fingers spread
apart will help to control your balance.


When you can rock forward into the hand balance, hold under control for a few
seconds and then return back into the full squat position then you can add a final
layer of complexity. From the squat position place your hands and extra 12-18
inches in front of your body. This time extend your hips up towards the ceiling so
that your knees are locked – you will now be in a Pike position and you should
feel your hamstrings stretching. Lift your heels and drive up onto your tip toes
taking the majority of the weight on your wrists, hold for 3 seconds and then step
your feet forward, placing the heels on the floor. Push your hips back towards the
wall for a few seconds, reducing the load on the wrists briefly, before repeating
the process again. Once your feet are within a few inches of your hands
you can drop back into the original full squat position and the drill is complete
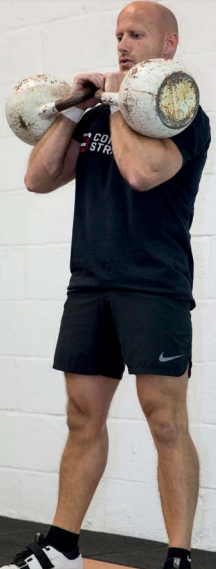
Perfecting a Double Kettlebell Front
Squat is a really nice stepping stone
before moving onto the Barbell.
Without any weights, place both palms
together and hold your fingers close
to your chin, as if you were praying.
This is the position we are looking for
the hands and arms to be in when
loaded up with the Kettlebells. To
save your gripping muscles keep the
fingers pointing up towards your face,
or wrap them very loosely around the
handle (as seen here) ensuring that the
Kettlebell handle sits at a 45-degree
angle across your palm. Once you have
a comfortable position at the top of the
squat then sit down nice and steadily
into the deep squat position. It goes
without saying that the heels need to
stay flat on the floor and your back
needs to stay nice and straight as you
move down through the squat, but you
also need to keep your elbows directly
beneath the kettlebells. So, as you
squat down the elbows will come away
from your body which gives you the
added bonus of some extra upper body
work…you are welcome!
At no point of this movement should
your shoulders round forwards, keep
pulling the shoulders back throughout
the entire movement, holding them
in a nice strong and stable position.
A steady controlled 3-second descent
would be nice, followed by a 2-second
pause at the bottom to ensure stability
and control, then drive up back into
the start position with an explosive
forward drive of the hips. Three sets
of 6-10 reps of this will be suitable
preparation before moving onto
the Barbell.


Place a barbell in a rack somewhere between your sternum and your shoudlers.
A mistake that a lot of people make is to place their fingertips on the bar, then
pushing their elbow forwards so that the barbell rests on the fingertips. This
can tighten up the muscles in the forearm and cause pain or discomfort in the
wrist. A more user-friendly option is to make the ‘OK’ sign with your thumb and
forefinger around the bar with your palms facing the floor (so the bar will go
between the circle you made), then drive the elbows forward as if you are revving
a motorbike so your palms will finish up facing the ceiling. This will allow you to
take a good grip of the bar and to remain in control at all times. The Barbell will
rest across the front of your shoulders and your fingers will be just outside the
line of your shoulders. Get your hips and feet directly beneath the bar and lift
the bar up out of the rack, take a couple of small steps back and you are ready
to squat.
Keep your eyes fixed on a spot on the floor about 6 feet in front of you. This
way your head can stay in a neutral position to your body throughout the entire
movement.
The teaching points for the Front Squat are exactly the same as we covered in
the Double Kettlebell Front Squat previously, it is just the shape and position of
the load that has changed.
One of the most common mistakes with the Front Squat is the dropping of the
elbows so it is important to drive the elbows up high, this will naturally cause
some tightness around the throat but you will get used to that over time.
To reduce any pressure on the wrists you need to try to grip the bar as tightly as
you can also.
TOP TIP: If you are struggling to keep the elbows up high then each time you
set the bar down there is a very simple stretch you can do. Place both arms
over the top of the bar so that the Barbell is resting under your armpits, then
turn your hands so the palms are facing up to the ceiling and allow your arms
to hang down as far as they can.. If you step up onto your tiptoes slightly
they will be able to hang down a little further. Once they are hanging as low
as possible then flex your arms up towards your shoulders 6-10 times. Then
step backwards into a split position and rest your elbows on the bar just level
with your shoulders, clasp your hands together and push your head down
between your elbows. Then switch your legs and repeat. The reason for
doing this in a split stance is because when your body goes into hip flexion,
it increases the amount of shoulder extension. Once your head is as far
forward as you can get it, then push both hands forwards so that they are in
line with your shoulders, again aim for 6-10 repetitions.
